How to install
To install the SOFA-Unity3D asset, follow these steps based on the version you downloaded. Depending, from where First you downloaded it, you might need to Unity3D package and follow those steps:
You can also refer to those video tutorials:
- Project Setup: Open your existing Unity project or create a new 3D project. Select the appropriate template (Standard, URP, or HDRP) based on the package version you downloaded.
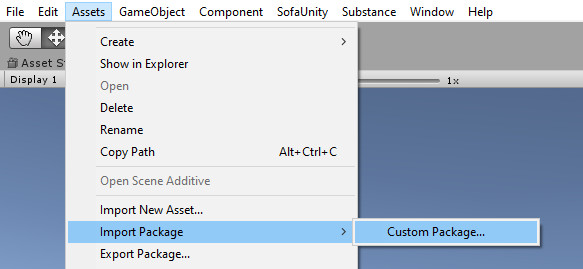
- Import Package: In the Unity Editor, navigate to
Assets -> Import Package -> Custom Packageand select the downloaded.unitypackagefile.
- SOFA DLL Files: Download the SOFA DLL files from the GitHub repository (
SofaUnity_v23.12_windows_dll.zip). Extract the contents into the directory{your Unity3D project}/Assets/SofaUnity/Plugins/Native/x64.- Note: If you downloaded the asset from the GitHub page, this step is unnecessary as the SOFA DLL files are included in the package.
- For additional Features only: Place the license file you received by email inside {your Unity3D project}/Assets/SofaUnity/License/. Replace the existing file if needed.
- Check Config File: Locate the
sofa.inifile in{your Unity3D project}/Assets/SofaUnity/Plugins/Native/x64/.- Update Paths: Ensure the paths in the config file point to your SOFA scenes and mesh directories.
The default configuration should look like this:SHARE_DIR={your Unity3D project}/Assets/SofaUnity/scenes/SofaScenes
EXAMPLES_DIR={your Unity3D project}/Assets/SofaUnity/scenes/SofaScenes
PYTHON_DIR={your Unity3D project}/Assets/SofaUnity/Core/Plugins/Native/x64/ - Custom Paths: If you prefer to use different directories for storing SOFA scenes and meshes, update the paths in the
sofa.inifile accordingly.
- Update Paths: Ensure the paths in the config file point to your SOFA scenes and mesh directories.
- Project Setup: Open your existing Unity project or create a new 3D project. Select the appropriate template (Standard, URP, or HDRP) based on the package version you downloaded.
- Import Package: In the Unity Editor, navigate to
Assets -> Import Package -> Custom Packageand select the downloaded.unitypackagefile.
- SOFA DLL Files: If you downloaded the package: SofaUnity_v23.12.00_public_withDLL.unitypackage this step is unnecessary as the SOFA DLL files are included in the package. Otherwise download the file (
SofaUnity_v23.12_windows_dll.zip). Extract the contents into the directory{your Unity3D project}/Assets/SofaUnity/Plugins/Native/x64 - For additional Features only: Place the license file you received by email inside {your Unity3D project}/Assets/SofaUnity/License/. Replace the existing file if needed.
- Check Config File: Locate the
sofa.inifile in{your Unity3D project}/Assets/SofaUnity/Plugins/Native/x64/.- Update Paths: Ensure the paths in the config file point to your SOFA scenes and mesh directories.
The default configuration should look like this:SHARE_DIR={your Unity3D project}/Assets/SofaUnity/scenes/SofaScenes
EXAMPLES_DIR={your Unity3D project}/Assets/SofaUnity/scenes/SofaScenes
PYTHON_DIR={your Unity3D project}/Assets/SofaUnity/Core/Plugins/Native/x64/ - Custom Paths: If you prefer to use different directories for storing SOFA scenes and meshes, update the paths in the
sofa.inifile accordingly.
- Update Paths: Ensure the paths in the config file point to your SOFA scenes and mesh directories.
PACKAGE CONTENT
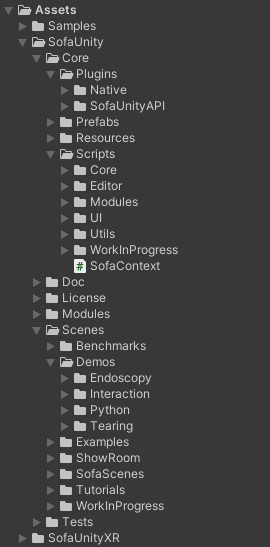
Once the SofaUnity asset is set up, the folder structure should resemble the following layout. Please note that some folders may only appear if you are using the main branch from the GitHub repository and might not be present in the official release versions. Additionally, the License and Modules folders are included only if you have requested specific assets beyond the core API of SofaUnity.

- Core → Main folder containing all files of this asset
- Plugins
- Native → SOFA x64 .dll files folder.
- SofaUnityAPI → C# API scripts interfacing with Sofa library.
- Prefabs → Unity prefabs to use SOFA Unity GameObjects
- Resources → Unity materials, textures and images.
- Scripts
- Core → List of classes to represent SOFA components hiearchy using Unity3D GameObject.
- Editor → Classes to implement SOFA components Unity Editor inspectors.
- Modules → Specific classes inheriting from the Core classes
- UI → 3D UI scripts to control SOFA player or components in Game.
- Utils → List of scripts of useful components/algorithms to use SOFA simulation.
- Plugins
- Doc → Offline documentation (prefer online version which is more up-to-date).
License → Folder to store the license. Only for specific assets (Modules).
Modules → Folder containing the different advanced features as additional assets.
- Scenes → Folder containing the different advanced features as additional assets.
- Benchmarks → Some specific Unity scene to benchmark SOFA components or integration
- Demos → Advanced simulation scenes to demonstrate SOFA capabilities. Such as endoscopy, carving, cutting, python scripting and tearing simulation.
- Examples → All basic examples to demonstrate SOFA integration in Unity.
- SofaScenes → All SOFA scene files in .scn or .py with their data.
- Tutorials → Work in progress tutorials, prefer using the examples.
- Tests → Folder containing non-regression scene test API.
CHECK INSTALLATION
After setting up the SofaUnity asset, the simplest way to verify a successful installation is by checking the Unity console for errors when you open one of the basic example scenes located in Scenes/Examples/, such as Example_01_SimpleLiver.unity or Example_02_Caduceus.unity. If no errors are present, proceed by playing the scene. You should observe the 3D model moving by default, and the movement should vary when you adjust the gravity value in the SofaContext UI inspector.
